PAISATRACE · USER GUIDE
Your first entry.
Your next month.
Start small: record your income and expenses. Goals and custom categories can come later.
Open PaisaTraceExplore the demo01 · Record money / 02 · Plan your month / 03 · Review progress
Screenshots show synthetic demo examples, never a real user’s records. Amounts and layout may vary with your currency and device.
Open a page directly
Sign in at /login. Your account pages use /app/; practice pages use /demo/. Demo records stay separate.
STEP 1
Create your account and sign in
- Open /signup to create an account. Enter your email, a password of at least 12 characters, and the same password again.
- Open the confirmation email once. It returns you to the public PaisaTrace website. Check the account shown, type your own email and continue only if you requested the link.
- On later visits, open /login and choose Sign in and use that email and password. On phones, a short benefit statement and demo action appear above the sign-in fields. Signing out keeps your account and records.
- Already confirmed that address? Do not create another account. Use Sign in. If you forgot your password, choose Set or reset password, open the latest email and save a new password.
The demo is for practice: its sample records stay in that browser and are not transferred into your account. Never share a confirmation or recovery URL; it can contain session credentials.
Back to top ↑STEP 2
Choose your currency and timezone
- Open Settings → Preferences. Choose Default entry currency and Timezone, then Save settings.
- Choose these before entering your own data. The timezone sets today’s default date; entries keep the dates you selected.
- Choose Reporting currency on Overview or Reports to change the report without changing the entry default. An individual entry can use another supported currency through Add entry.
Currencies are kept separate and are never converted. Changing the entry default previews the effect before saving. Existing entries, budgets, named goals and earlier planning/emergency amounts retain their original currencies. No plans are reset.
Back to top ↑STEP 3
Record income as it arrives
- Open Income. Income received totals saved actual records for the selected dates and currency. No income target or source setup is required. View received records opens your income history in Money Log.
- Choose Record income for money already received. Sources and expectations are optional; unexpected and unassigned income are valid. More details offers Income source when you have matching sources and Match upcoming payment when eligible payments exist. Matching is always your choice.
- Open optional Income sources and choose Add source to name an employer, client, business or property. Select its category, regular or variable pattern and default currency. You can optionally add an expectation for the current period. A source is who pays you; Freelance is a category, while Client A is a source.
- Open optional Upcoming income → Add expected payment for money not received yet. When it arrives, choose Record receipt. Review the prefilled category, source, currency, date and amount, then Save entry. For a partial receipt, enter only the amount that arrived.
- A PKR 30,000 expectation with a PKR 20,000 receipt leaves PKR 10,000 still expected. Edit expectation to revise its total, or Cancel remainder. Edit or delete the linked Money Log entry to correct a receipt.
Expected payments never increase actual income or available money. Each receipt is one transaction, linked to its expectation. Received uses the receipt date; the expectation remains in its original planning period.
Back to top ↑STEP 4
Add everyday expenses
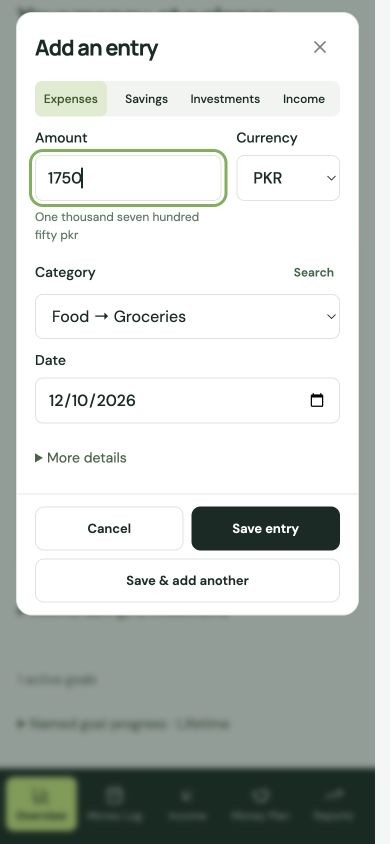
- Choose Add expense beneath Budget remaining on Overview. In Money Log, choose Add entry and select Expenses. Enter the amount and choose what you spent on, such as Home → Rent or Transport → Petrol. The picker groups choices by parent, offers recent selections first, and has Search for finding a name.
- For a choice that is missing, select Other — enter a custom name and enter a spending name. It becomes a reusable expense category.
- Check the amount in words and its currency, then choose Save entry. Today is already selected.
- The popup includes date and currency fields. Open More details for payment type and note; Save entry stays in the footer while the form scrolls. Choose an optional payment type: Cash, Credit Card, Debit Card, Bank Account or Others. This is a label, not a linked financial account. Payment type is omitted when it was not recorded.
Selecting a subcategory saves it under its parent automatically. You can record multiple separate expenses on the same day.
STEP 5
Save several expenses together
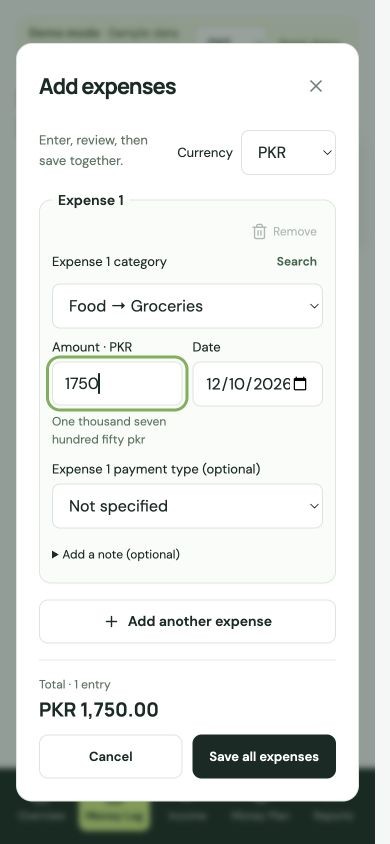
- In Money Log, open More actions → Add multiple expenses. Each expense has its own category, amount, date, optional payment type and note.
- Choose Add another expense to add a row. The last category is offered again within this session; change it when needed. Use Remove to discard an unsaved row.
- Check the running total in the selected currency, then Save all expenses. All rows save together. A validation error highlights the affected fields without losing your entries.
- If a save fails, keep this session open and retry. The same entry IDs are reused to prevent duplicate submission. Cancel asks before discarding a filled draft.
- For one expense at a time, use Add expense or Add entry. Save & add another saves that entry and keeps the popup open with its category and date.
A session supports up to 50 expenses in one currency. Identical expenses are valid separate purchases. If dates span months, your current dates and filters remain unchanged. A notice offers View entry for a saved record outside this view; every record keeps its own date.
STEP 6
Track savings and investments
- In Money Log, choose Add entry, then select Savings or Investments.
- Select a category or subcategory, or choose Other — enter a custom name to save a reusable category. Enter a positive amount and choose Contribution for money put away.
- For money taken back out, choose Withdrawal and enter a positive amount. The app subtracts it from that type’s net contributions.
These totals measure money contributed minus withdrawals, not your bank balance or market returns. Record each movement once; moving money into savings is not also an expense.
Back to top ↑STEP 7
Make categories fit your life
- Open Categories. Search by category or subcategory name, filter by type and Active/Archived status,.
- Choose Other — enter a custom name in an entry form to create a reusable category without leaving the form. Or use Add category for a main group. Expand Subcategories, then use Add subcategory to [category name] for detail within expenses, savings or investments—for example Home → Rent and Bills.
- Open More → Edit to rename a category or restore an archived category. Archive hides a linked choice while its existing entries stay intact. Delete appears only for unused choices.
Main totals include their subcategories once. Money Plan connects named savings and investment goals with optional spending limits. Their actual amounts include subcategories once; archiving a linked choice keeps its history intact.
Back to top ↑STEP 8
Make one connected Money Plan
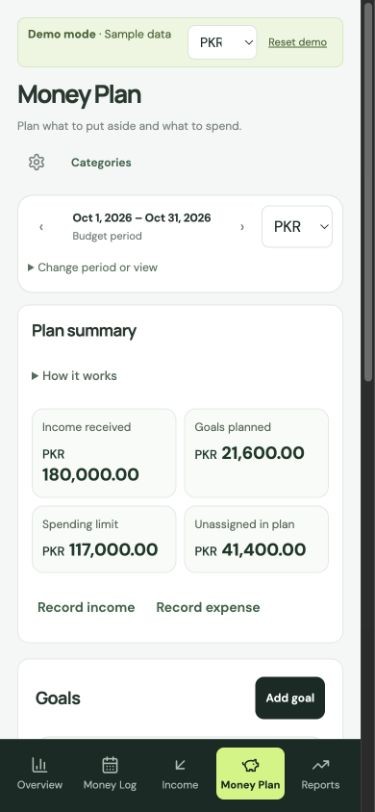
- Open Money Plan. One period and reporting currency govern its summary, Goals and Spending plan. Goals appear first; you can start planning before any income arrives.
- Income received is actual recorded income. Planned goal contributions add only saved contribution amounts for these exact dates and currency, including paused or completed goals whose plans you kept. Lifetime targets and upcoming income are excluded.
- Unassigned in plan = income received − goals planned − spending limit. It measures whole-period commitments; recording a planned contribution or expense does not subtract it again.
- With no spending limit, Unassigned in plan is income after planned goals. Open How it works for the formula. A negative amount says Plan exceeds received income; you can edit goals or spending, record income, or keep the plan.
- Open Activity for spending, net savings, net investment contributions and recorded income left. These recorded totals are distinct from plan commitments.
- Example: PKR 100,000 received − PKR 20,000 goal contributions planned − PKR 65,000 spending limit = PKR 15,000 unallocated. Recording PKR 5,000 savings and PKR 10,000 expenses leaves that plan figure unchanged, while recorded income left becomes PKR 85,000.
Plans are optional and currencies stay separate. These are planning and record-based figures, never cash or bank balances.
STEP 9
Set optional spending limits
- In Money Plan, scroll to Spending plan. Check the selected dates and reporting currency. Choose Set limit or Edit.
- Open Use previous plan for Copy previous plan, Use previous spending or Start from scratch. These fill editable drafts only. They never create entries. Save spending plan confirms your changes.
- Set an optional overall base limit and category limits inside it. Choose a parent including its children, or individual children, never both. If categories exceed the overall base, the difference is shown; raise the overall or reduce categories before saving.
- Blank uses the sum of category limits, or No spending limit when none exist. Zero is an intentional zero limit. Expenses can still be recorded after a limit is reached; overspending stays visible.
- More options contains carryover and a percentage helper using received income only. Apply to draft limit, then Save spending plan. Later income never resizes the saved amount.
- Opt-in rollover adds positive unused allowance from the immediately previous saved period in the same currency. When carryover is positive, expand its adjustment to see base, carryover and effective limits. Matching category limits can carry unused amounts; they are not added twice to the overall allowance. Overspending and goal plans do not roll forward.
Spending limits are allowances. Saving a spending plan does not change goals, income, transaction history or bank balances.
Back to top ↑STEP 10
Save toward a named outcome
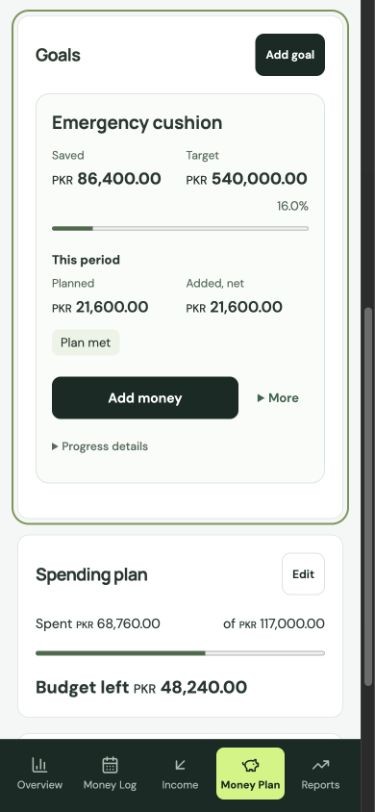
- In Money Plan → Goals, choose Add goal. Enter a name, target and currency. Name examples include Emergency fund, Laptop and Holiday. Plan a contribution and More options are optional sections.
- Set an optional contribution plan for the selected period. Blank means No contribution planned; zero is intentional. A lifetime target of PKR 200,000 and a PKR 5,000 period plan allocate only PKR 5,000. To reuse an earlier general savings plan, first save a named goal, then Edit goal → Use an earlier savings plan. Choose Review earlier plan and Save goal to confirm; it can be assigned to only one goal.
- Choose Add money when you put money aside. Its suggestion uses the remaining contribution plan for this period. Plan met or Above plan leaves the amount empty; extra contributions are optional. More → Withdraw records money taken back out. Both create one savings or investment movement; neither creates income or expenses.
- Use More → Link existing entry to assign an unlinked savings or investment record to the goal without adding another transaction. Do not link money already counted in starting savings.
- Progress is starting savings plus linked contributions minus withdrawals across all periods. Open More to edit, pause, resume or link an entry. Complete becomes available when the lifetime target is reached. Pause or Complete asks whether to keep or clear the current contribution plan; older plans and all recorded progress stay intact. New periods have no contribution plan unless you set one.
A deadline provides an approximate per-period contribution guide, without assumed interest or returns. Investment goals track contributions, not market value. Goal progress never resets at the month boundary.
STEP 11
Choose calendar months or a budget cycle
- Overview, Income and Money Plan share the planning period selector. Use Previous period, Next period, Go to date or Current period. Money Log and Reports have their own Date mode, with Budget period selected initially. The actual start and end dates are always shown.
- In Settings → Budget cycle, open Change budget cycle and choose a start day. Start from next available period displays its known date; Schedule a later start is optional. Preview and confirm the change. A day-25 cycle runs from the 25th to the 24th.
- The first period after a change may be shorter while boundaries align. Days 29–31 clamp to the last available day in shorter months.
- The change starts only at the future boundary. Past plans and transaction dates stay unchanged. Choose Calendar month in View for ordinary calendar reporting; the same transactions can appear in either date-based view.
A plan belongs to its exact saved dates and currency. Future plans for older date ranges remain in your exported history; create or copy a plan for the new range. Comparisons use the same selected cycle.
Back to top ↑STEP 12
Read your overview and reports
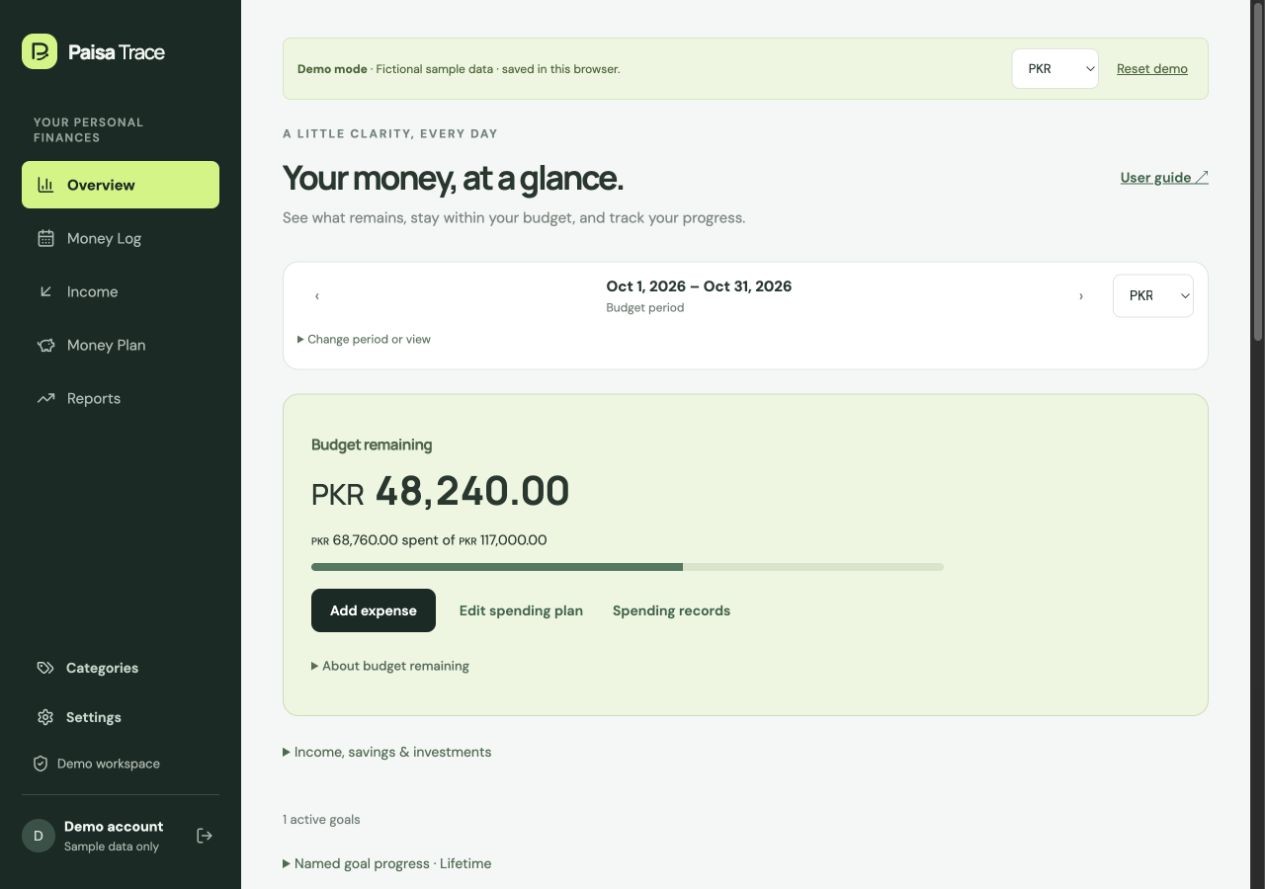
- Budget remaining is the main figure. Read spending against the saved allowance, its progress bar and any rollover, then choose Add expense. Missing plans show Budget not set; overspending remains visible.
- Open Income, savings & investments for supporting recorded totals. Upcoming income stays in the optional Income section and never enters actual arithmetic. Named goal progress shows lifetime amounts.
- See where your money goes switches between expenses and actual income. The inner ring shows categories and the outer ring their subcategories. A single broad Expenses category shows spending areas directly while preserving its history. On Overview, select a slice to open its Money Log records.
- Open Reports for recorded totals. Comparisons show Through [date] and compare matching elapsed days by default. Full previous period is an explicit alternative. No prior activity is labelled separately. Date mode offers Budget period, Calendar month, Full year, Custom dates and All history. Forecasts are excluded.
- Money Log has search, entry filters, corrections and Excel export. Date mode supports calendar months, full years, all history and custom dates without changing Overview’s planning context.
Recorded income left = income received minus spending and net savings/investment contributions. It is a record-based figure, not a bank balance. Currencies are never combined or converted. Detailed Money Log filters affect only its list and export.
STEP 13
Find, correct and export records
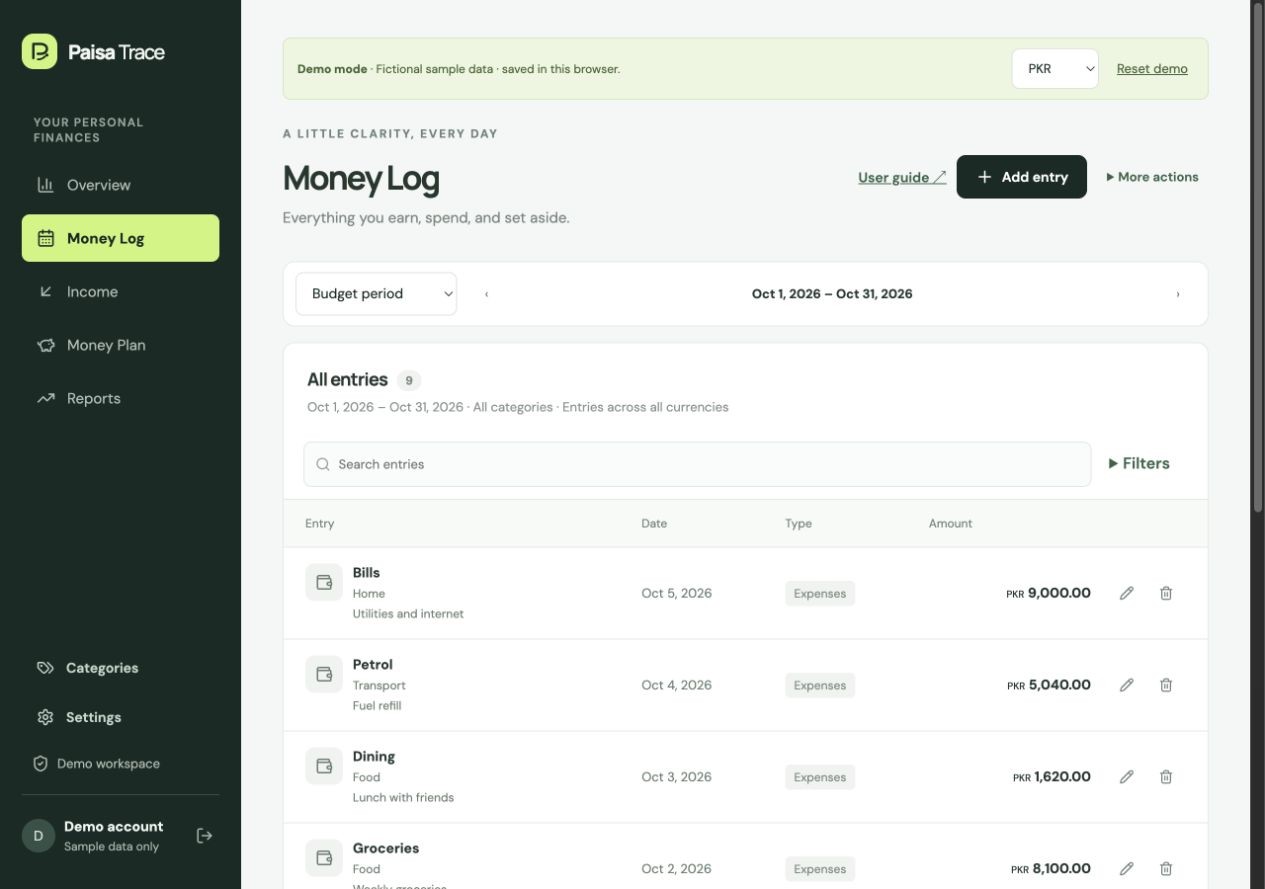
- Open Money Log — everything you earn, spend, and set aside. Choose the period, search by note, category, subcategory or type. Open Filters for category, entry type, payment or currency; the active count remains visible. Chart drill-down also filters the chosen subcategory.
- Choose Clear entry filters to remove search, type, category, subcategory, payment-type and entry-currency filters. Choose another period if the record is still missing.
- On a phone, open the three-dot Actions button and choose Edit or Delete. On desktop, use the edit pencil. Save entry applies corrections and preserves dates, filters, search and your place. If the saved record no longer matches, a notice offers View entry or Dismiss. Clear entry filters is also available when entry filters are active. Deleting shows the exact amount, currency, category, date and note before you confirm Delete entry; it removes the record from your reports.
- Open More actions → Export Excel to download the selected period and entry filters. The workbook includes entries and summaries with currencies kept separate.
Export important records before deleting them. Settings → Account offers Export all records and Request account deletion; Help offers the guide and Contact support. Deletion requests and their status are handled by email after ownership verification; signing out is not account deletion.
Troubleshooting
I did not receive a signup email. What next?
If you already confirmed the address, use Sign in instead. For a new or unverified account, check spam and that the email is correct, wait at least a minute, and try again. If it still fails, contact support. Do not share passwords or email-link tokens.
Why does my plan not show in Overview?
Choose its exact saved period dates and reporting currency. Named goals track lifetime progress separately. A plan does not create actual transactions.
Where is my saved entry?
Check the entry date, reporting year/month, category/entry currency filters and search. Clear entry filters. Another currency may appear in the entry list without being included in the display-currency totals.
Will rent or subscriptions be added automatically?
No. Entries are manual. Record recurring payments when they occur. Automatic recurring entries, bill reminders and debt tracking are not currently available.
Can I use another phone or computer?
Yes: sign in to the same account. The demo stays in its own browser; real account records are stored online. If a save reports an error, retry after checking your connection rather than assuming it succeeded.
Contact Salman Javed at salman.se95@gmail.com.